Overview
This book is based on my work with the kids at camp. And, at camp, we only have five days of class time to conceive and build a working game. Most of the students have no prior experience with programming.
Day one involves installing the tools that we’ll use while discussing the game we’d like to make. Then we write a simple “game” to make sure that our development environment is properly configured.
Following that same model in the book, we will cover the installation of the tools in this chapter and then ensure our development environment is properly configured. We’ll actually build a simple game in the next chapter.
Supported Target Platforms
The whole point of MonoGame is to provide a single framework that runs on as many devices as possible. That list is large, and it will continue to grow.
To keep things simple in this book, I’ve decided to limit the discussions to running games on the three development platforms - Windows, Mac OS X, and Linux. The rationale was simple. You’re already using your development machine to write your game, and you’ll need to run and debug on that platform anyway.
NOTE: I may make one exception. I’m excited about writing code for my PlayStation Vita, and technically, it’s a different development platform (well, a different IDE on Windows).
Time permitting; I’ll add one or more chapters at the end of the book to cover the specific issues you’ll need to account for when targeting the other platforms. At a minimum, all of the examples should have buildable and runnable projects that you can download for all the platforms that I’m able to support.
The phrase, “that I’m able to support”, sounds suspicious. What do I mean by that? Well, it basically means two things:
- The MonoGame implementation for the target platform is stable enough to support my example game.
- The example makes sense on the platform – e.g. you’re probably not using a touchscreen and accelerometer with your Ouya, and you’re not likely to use a mouse with an iPhone.
Supported IDEs
I know that the MonoGame build process supports a Visual-Studio-driven workflow for Xamarin build tools (for example using Visual Studio to kick off Xamarin tools on a Mac to build and debug iOS apps from Windows), but I want to keep the scope of this volume narrow. I’m assuming that you’re using MonoDevelop (Xamarin Studio) as your primary development environment, running on one of the three OSes mentioned earlier.
Honestly, though. Once your development environment is configured (you know, by clicking Next, Next, Next, … from the installer), the game code is very similar. It’s just the application hooks that vary. And you really shouldn’t have to worry about that if MonoGame is doing its job well.
For the Mac OS X and Linux platforms, I recommend that you run the latest version of the operating system available. In fact, the primary development tool for OS X, XCode, won’t install unless your computer is running the latest version of the operating system. In the case of Windows, however, I’ll be the first to admit that I’m prejudiced. I just don’t like Windows 8, so I still use Windows 7 when developing for the various Windows platforms. I’ll be sure to test every example in the book within a Windows 8.x environment, though.
NOTE: I really hate detailing the installation process in a book. Technology moves so fast that the steps described in this chapter may be obsoleted by the time you read them. For example, MonoDevelop may have a kick-butt template system where you can generate new MonoGame projects out of the box with just a few clicks. That’s not the case today. So, I’ll fight my instincts and document the steps that I took when creating the examples for the book - including the steps to prepare my development environments.
A Note on Project Templates
I love project templates – when they work, that is. But templates have a tendency to become outdated and broken. For XNA, the project templates were a part of the release. When each new version came out, there was a new “click here, here, and here” to create an empty project for the new version of the APIs.
With MonoGame, the templates aren’t a part of the release. They’re maintained separately. That’s why I’ve decided to provide you with handcrafted “empty” projects for each platform. Each contains all the components required to write your game. MonoGame may move on (and likely will have moved on) to a new version by the time you get around to writing your next Cut the Rope killer, but it won’t matter. Everything that you need will be included in the project – including the version of the MonoGame framework that was used to build it.
After detailing the installation process for the tools, I’ll describe the process of creating empty MonoGame projects for each platform (hooray for Color.CornflowerBlue!) so that you know what’s going on under the covers if you’d like. You can feel free to skip those details for now. They’ll be here waiting for you if you need them later. In fact, I suggest that you do ignore the “Empty Project: {Target Platform}” sections for now. Come back after you have a few MonoGame projects under your belt. It should make more sense then.
NOTE: For the curious, my personal workflow is to build each example game in Xamarin Studio on my MacBook Pro. I then make sure the same example works in Windows, before moving on to the next. When all the examples have been written, I’ll return to spackle the gaping holes in platform support.
Along the way, I’ll test the odd example on one of the other platforms (like Android, Ouya, or PS Vita - since they’re free to deploy) just to make sure there aren’t any systemic flaws in the organization of the example games.
{pagebreak}
Installing the Tools: Mac OS X
If you do any OS X or iOS development, you’ll need to install XCode - the primary development environment for those platforms. As I mentioned earlier, XCode won’t install unless your computer is running the latest version of OS X. So, your first step may be to upgrade your OS. Luckily, it appears that Apple has decided to release their new OS upgrades for free.
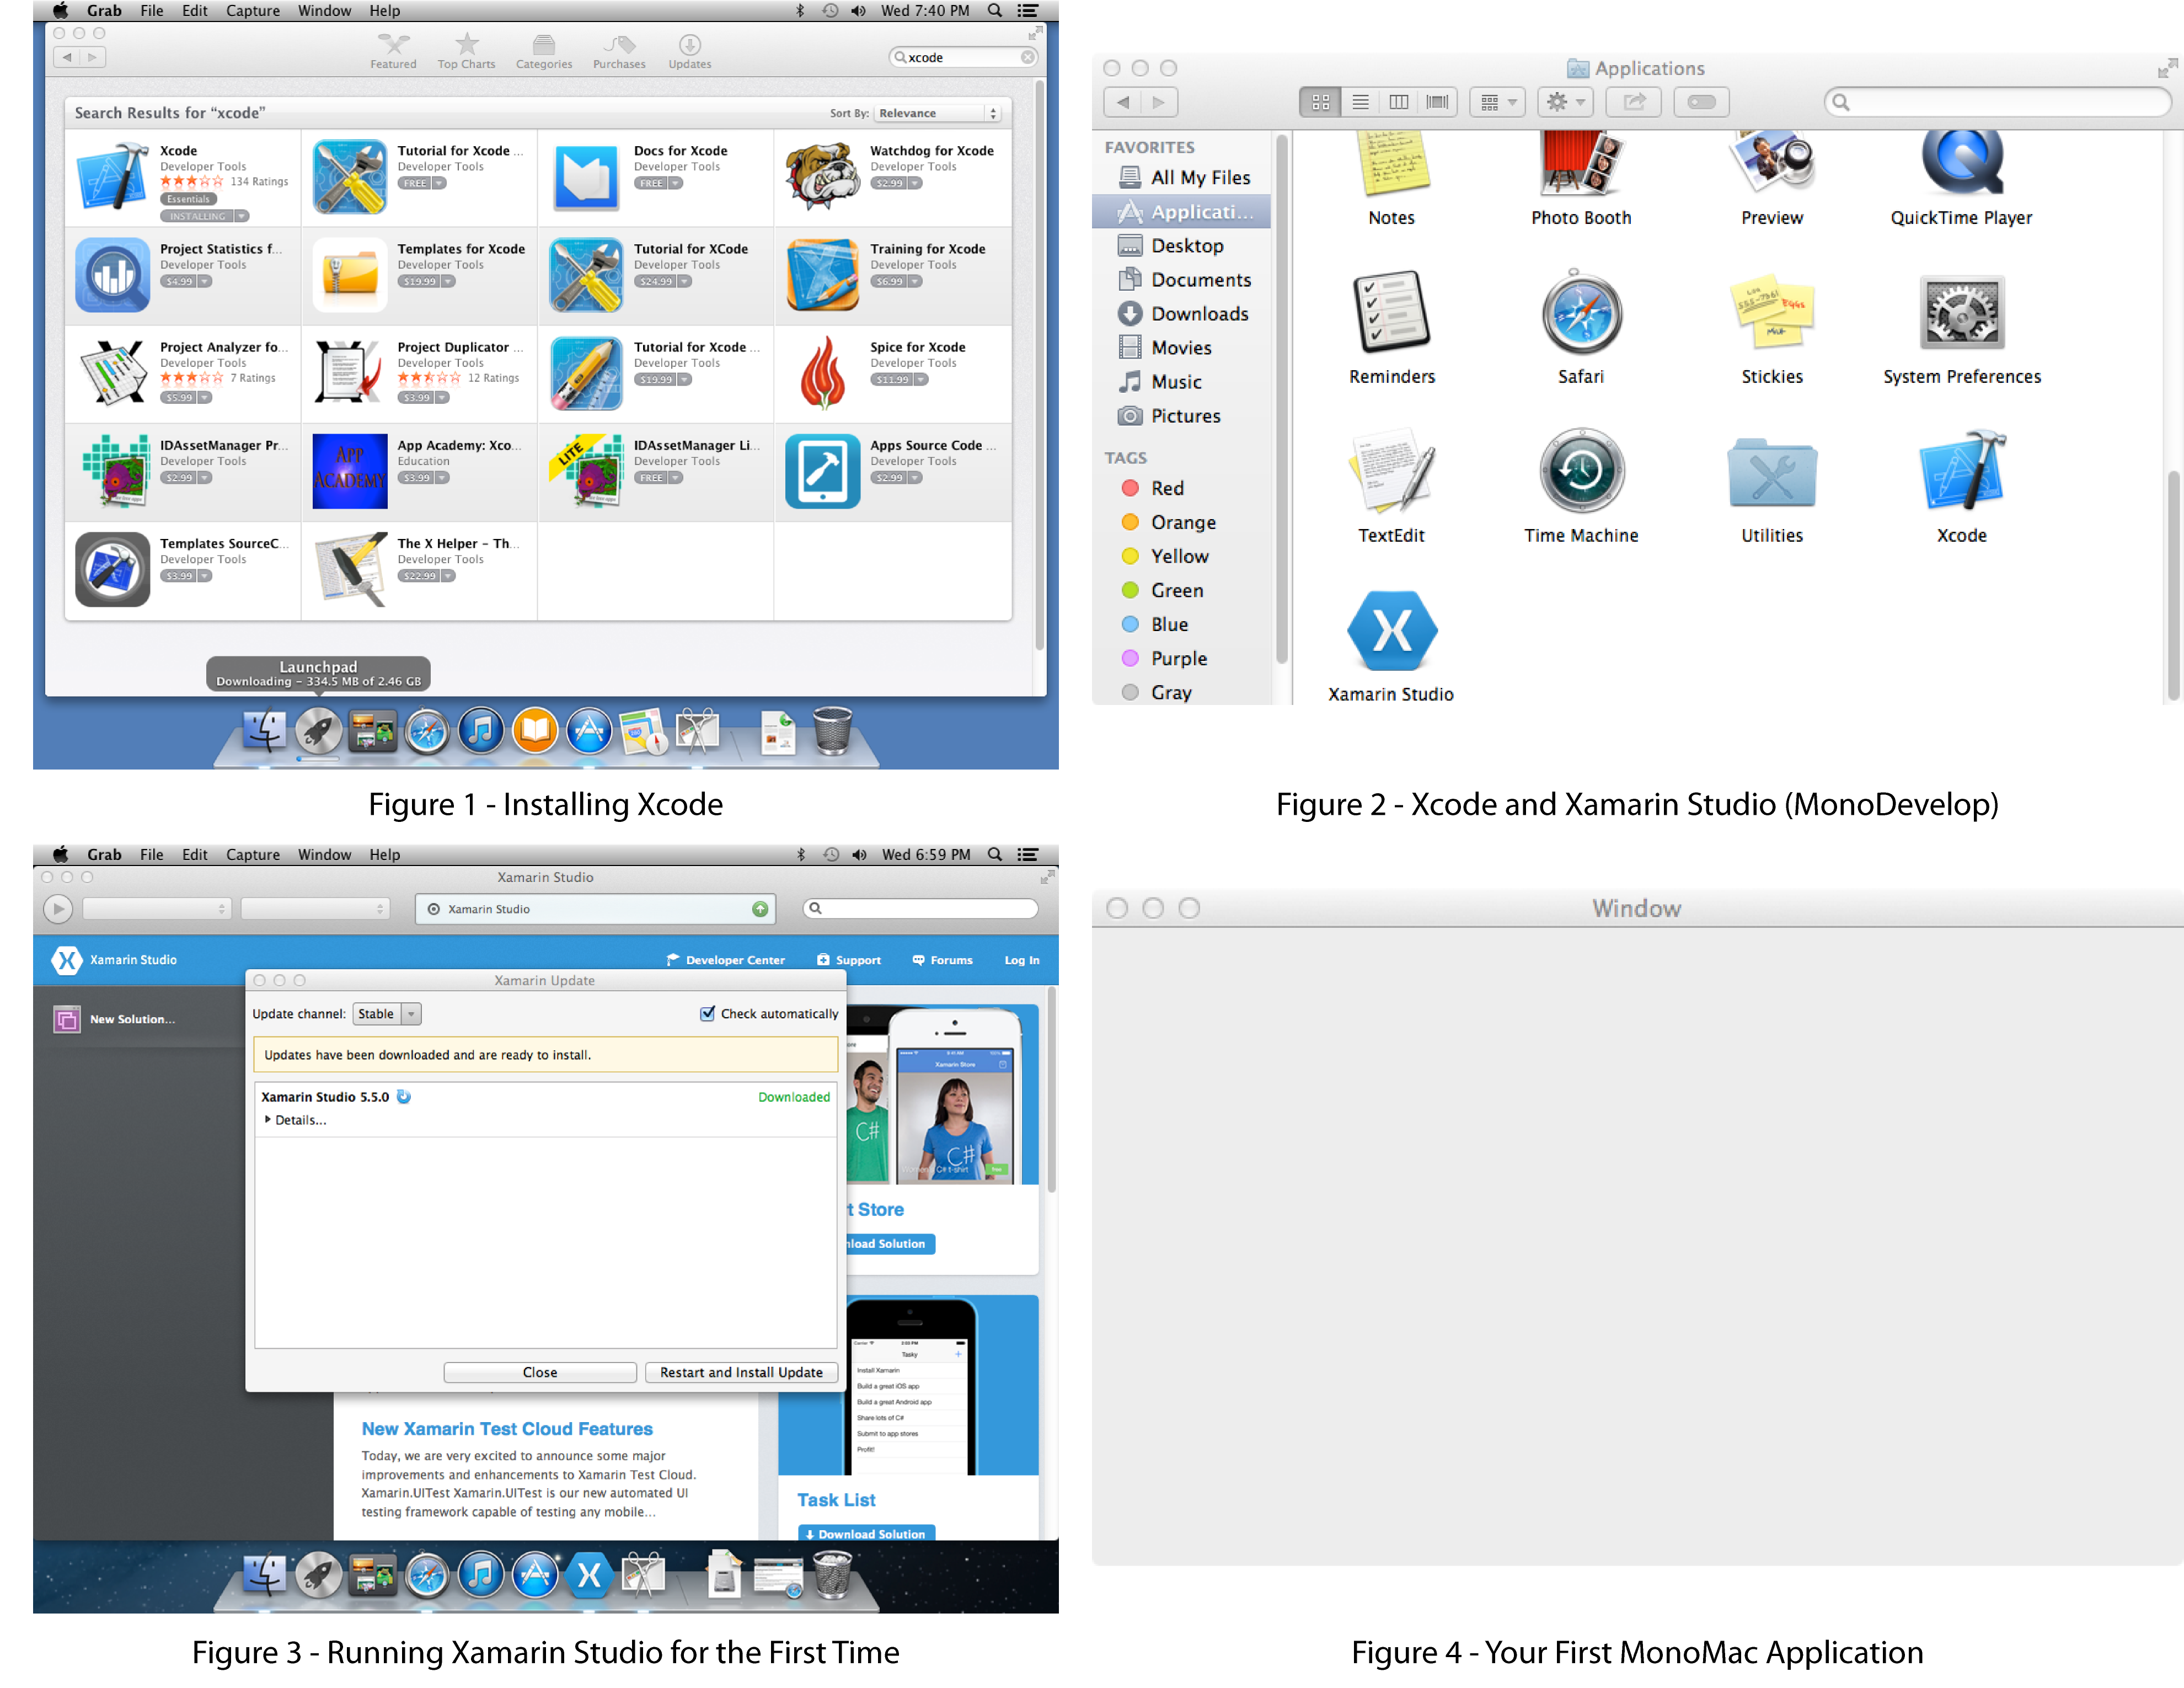
To install XCode, just open the App Store and search for “xcode”. It should be the first app in the list. This would be a good time to freshen up your coffee. The download and installation of XCode can take a while.
Once XCode has been installed, you will need to run it once so that the components can be initialized. As soon as XCode finishes launching for the first time, you can close it. We’ll spend as little time in XCode as possible. Most of our tasks can be handled using MonoDevelop.
Speaking of which, now’s the time to download MonoDevelop (Xamarin Studio) and the Mono Development Kit (MDK). Both links can be found on the “Download” page of the MonoDevelop website using the following URL.
http://monodevelop.com/
Once the downloads have completed, you’ll want to install the MDK first, and then MonoDevelop.
When those steps are complete, you should have a fully functioning development environment. Both Xcode and MonoDevelop (Xamarin Studio) should appear in both the OS X Launchpad and in the Applications folder.
Verify the Installation: Mac OS X
Go ahead and launch Xamarin Studio. Unless you change the default behavior in the settings, every time Xamarin Studio runs, it will check for updates. Chances are pretty good that there will be an update available the first time you open the application. So, give it a few minutes before you move on.
We begin by creating a new MonoMac project. Create a new solution by selecting File / New / Solution from the menu. The “New Solution” dialog will open. Expand the “Unsupported” option in the left pane. Select “MonoMac (OpenSource)”, and then select the “MonoMac Project” in the middle pane. Let’s name our new solution “MyFirstApp”. Click the OK button. In a few short seconds, you’ll have a shiny, new MonoMac application project.
Click the Play icon at the top, left of the IDE or select Run / Start Debugging from the menu. You’ll be rewarded with an empty gray window. Congratulations. You’ve just written your first MonoMac application.
{pagebreak}
Installing the Tools: Windows
Blah. Blah. Blah.
Verify the Installation: Windows
Blah. Blah. Blah.
{pagebreak}
Installing the Tools: Linux
Blah. Blah. Blah.
Verify the Installation: Linux
Blah. Blah. Blah.
{pagebreak}
Installing the Tools: Ouya
Blah. Blah. Blah.
Verify the Installation: Ouya
Blah. Blah. Blah.
{pagebreak}
Installing the Tools: PS Vita
Blah. Blah. Blah.
Verify the Installation: PS Vita
Blah. Blah. Blah.
{pagebreak}
Installing the Tools: iOS
Blah. Blah. Blah.
Verify the Installation: iOS
Blah. Blah. Blah.
{pagebreak}
Installing the Tools: Android
Blah. Blah. Blah.
Verify the Installation: Android
Blah. Blah. Blah.
{pagebreak}
Empty Projects
The team of developers that maintains the MonoGame project has created a new repository for sample games. Their goals were set forth in a post to the MonoGame blog from Simon Jackson on April 17, 2014.
… [T]he core MonoGame team set out with a purpose to being a new samples repository for the project. Its goals were simple:
The samples had to be of high quality. They had to work on ALL platforms not just one. Best practices had to be used where possible. They had to be testable and re-usable to test the latest builds (builds may not pass if samples tests failed) …
So, that sounds like a good place to start. When Simon posted the news item on the MonoGame website, there was a whopping one sample game – Platformer2D. But one is all we need. The samples repository can be accessed from the following URL.
https://github.com/Mono-Game/MonoGame.Samples
Copy-and-Paste #1: Main.cs
We’ll be using the “Main.cs” from that example game for all our empty projects. It provides the launching point for all platforms using conditional compiler directives.
using System;
#if MONOMAC
using MonoMac.AppKit;
using MonoMac.Foundation;
#elif IPHONE
using MonoTouch.Foundation;
using MonoTouch.UIKit;
#endif

namespace MyFirstGame
{
  #if MONOMAC
  class Program
  {
     static void Main (string[] args)
     {
        NSApplication.Init ();

        using (var p = new NSAutoreleasePool ()) {
           NSApplication.SharedApplication.Delegate = new AppDelegate ();
           NSApplication.Main (args);
        }
     }
  }

  public partial class AppDelegate : NSApplicationDelegate
  {
     private MyFirstGame game;

     public override void
     FinishedLaunching (MonoMac.Foundation.NSObject notification)
     {
        game = new MyFirstGame();
        game.Run();
     }

     public override bool
     ApplicationShouldTerminateAfterLastWindowClosed (NSApplication sender)
     {
        return true;
     }
  }
  #elif IPHONE
  [Register ("AppDelegate")]
  class Program : UIApplicationDelegate
  {
     private MyFirstGame game;

     public override void FinishedLaunching (UIApplication app)
     {
        game = new MyFirstGame ();
        game.Run();
     }

     static void Main (string [] args)
     {
        UIApplication.Main (args,null,"AppDelegate");
     }
  }
  #else
  #if !WINDOWS_PHONE
  /// <summary>
  /// The main class.
  /// </summary>
  public static class Program
  {
     static void Main()
     {
     #if WINDOWS || LINUX || PSM
        using (var game = new MyFirstGame ())
        game.Run();
     #else
        var factory =
           new MonoGame.Framework.
           GameFrameworkViewSource< MyFirstGame >();
        Windows.ApplicationModel.Core.CoreApplication.Run(factory);
     #endif
     }
  }
  #endif
  #endif
}
You can search and replace “MyFirstGame” with whatever your new project name is.
Copy-and-Paste #2: Game.cs
We’ll use the following Game.cs for all our empty game projects. I resisted the urge to include a simple implementation for LoadContent, Update, and Draw. I think that a blank, blue screen isn’t very impressive, but it’s the perfect canvas from which to start your own projects.
using System;
using System.Collections.Generic;
using Microsoft.Xna.Framework;
using Microsoft.Xna.Framework.Graphics;
using Microsoft.Xna.Framework.Input;
using Microsoft.Xna.Framework.Media;
using Microsoft.Xna.Framework.Input.Touch;

namespace MyFirstGame
{
  public class MyFirstGame : Microsoft.Xna.Framework.Game
  {
     // Resources for drawing.
     private GraphicsDeviceManager graphics;
     private SpriteBatch spriteBatch;

     public MyFirstGame ()
     {
        graphics = new GraphicsDeviceManager(this);
        Content.RootDirectory = "Content";

        #if WINDOWS_PHONE
        TargetElapsedTime = TimeSpan.FromTicks(333333);
        #endif

        //graphics.IsFullScreen = true;
        //this.IsMouseVisible = false;

        graphics.PreferredBackBufferWidth = 800;
        graphics.PreferredBackBufferHeight = 480;

        graphics.SupportedOrientations =
           DisplayOrientation.LandscapeLeft |
           DisplayOrientation.LandscapeRight;
     }

     protected override void LoadContent()
     {
        // Create a new SpriteBatch, which can be used to draw textures.
        spriteBatch = new SpriteBatch(GraphicsDevice);

        // TODO: Load content
     }

     protected override void Update(GameTime gameTime)
     {
        // TODO: Update world

        base.Update (gameTime);
     }

     protected override void Draw(GameTime gameTime)
     {
        graphics.GraphicsDevice.Clear (Color.CornflowerBlue);

        // TODO: Draw world

        base.Draw (gameTime);
     }
  }
}
You can search and replace “MyFirstGame” with whatever your new project name is.
Empty Projects (About-Face)
I fully intended to document the steps for creating an empty project for each platform. But, once I got waste deep into the first platform, I realized how tedious and error-prone the process is. I’m going to provide empty projects for each platform on my website. If there’s enough demand, I’ll document the steps for one or two of the platforms as one or more blog posts.
In a nutshell, each platform is conceptually the same. You create an empty project, add in the cut-and-paste code snippets listed earlier (into Main.cs and Game.cs, creating them if they don’t exist), and then set some project properties.
I’ve written some helper classes to handle most of the platform voodoo, but they’re not referenced in the above snippets for the sake of keeping the code pure (pure MonoGame, that is).
Compiler directives that I pulled straight from the MonoGame Framework projects drive the “voodoo”. I’ll list them here for your convenience. Note that they are subject to change. So, you should check the latest values in the MonoGame repository if you’re having platform-specific issues.
| Platform | Constants |
|---|---|
| Android | TRACE; ANDROID; GLES; OPENGL; |
| Linux | LINUX; OPENGL; |
| MacOS | MONOMAC; OPENGL; |
| Ouya | TRACE; ANDROID; GLES; OPENGL; OUYA; |
| PSMobile | DEBUG; PSM; |
| Windows | DEBUG; TRACE; WINDOWS; DIRECTX; WINDOWS_MEDIA_SESSION; |
| Windows8 | TRACE; NETFX_CORE; WINRT; WINDOWS_STOREAPP; DIRECTX; DIRECTX11_1; WINDOWS_MEDIA_ENGINE; |
| WindowsGL | TRACE; WINDOWS; OPENGL; |
| WindowsPhone | TRACE; DEBUG; SILVERLIGHT; WINDOWS_PHONE; WINRT; DIRECTX; |
| iOS | IOS; GLES; OPENGL; |
If you use my helper class, PlatformHelper, you shouldn’t need to reference those via compiler directives, but they will need to be set in your game’s project options.
Using the helper, you can write code like the following.
if(PlatformHelper.CurrentPlatform == Platforms.WindowsPhone)
{
  TargetElapsedTime = TimeSpan.FromTicks(333333);
}

graphics.IsFullScreen = PlatformHelper.IsMobile;
this.IsMouseVisible = PlatformHelper.IsDesktop;
Without the helper, the conditional logic gets messy. For example, the property, PlatformHelper.IsMobile, knows that Ouya is not a mobile device, even though the ANDROID compiler directive is set.
There’s nothing special about the code that performs the various checks for you. You need not use my classes if you don’t want to. They’re just provided as a convenience.
{pagebreak}
Summary
Blah. Blah. Blah.
Review Questions
Blah. Blah. Blah.
Exercises
Blah. Blah. Blah.